
Installation and use
System Requirements
- GNU/Linux OS (e.g. Debian 8 Jessie) or Mac OS X 10.9+ on the host machine
- Python 2.7
- PySerial 2.7 (version 3.0 is not currently compatible with TinyOS)
- PyQt4
port install py27-pyqt4).
To be able to compile and install the mote-side code you will need one of the following toolchains, depending on the hardware you want to use.
- For TMote Sky:
- TinyOS 2.1.2 or newer
- msp430-gcc 4.3.6 (on Mac OS X available through MacPorts:
port install msp430-gcc msp430-libs)
- For Waspmote:
- Waspmote IDE
- MySQL 5
- mysql-connector-python 1.1.7
TMote instructions
Installation
- Download and unzip the TRIDENT software package. We refer to the main TRIDENT directory with
$TRIDENT. - Install all required software on your PC.
- If you plan to export data to a database, initialise it by running the script
$TRIDENT/database/createtrident.sql. In$TRIDENT/database/DBDescription.pdf, a description of the database structure can be found.
Program the nodes
Before the first use you have to compile the TRIDENT firmware and install it on the wireless nodes (including the master node) used for experiments.
In the nesc subdirectory, type the following:
./make.net
After the firmware is compiled, install it to the experiment nodes.
Plug in the nodes one after another and type the following command, specifying the node_id and the serial port:
make tmote reinstall,node_id bsl,serial_port
Notes:
Node IDs should be within 0–39, you should definitely have a node with ID zero as it means a special role, the master node.
Use motelist command to get the associated serial port (e.g., /dev/ttyUSB0).
Program the gateway node
The gateway node is used with the in-field assistant GUI to configure the network, start or interrupt an experiment and monitor the network status.
The code of the gateway is located in $TRIDENT/nesc/gateway directory.
Compile the gateway application and install it on a node:
make tmote reinstall,node_id bsl,serial_port
Note: the node_id of the gateway should be set to 1000.
Create a new experiment and set the parameters
To run the application, go to the $TRIDENT directory and type:
./trident
From the user interface create a new experiment or clone parameters of an existing experiment.
Note that it is impossible to change the parameters after the experiment configuration is generated.
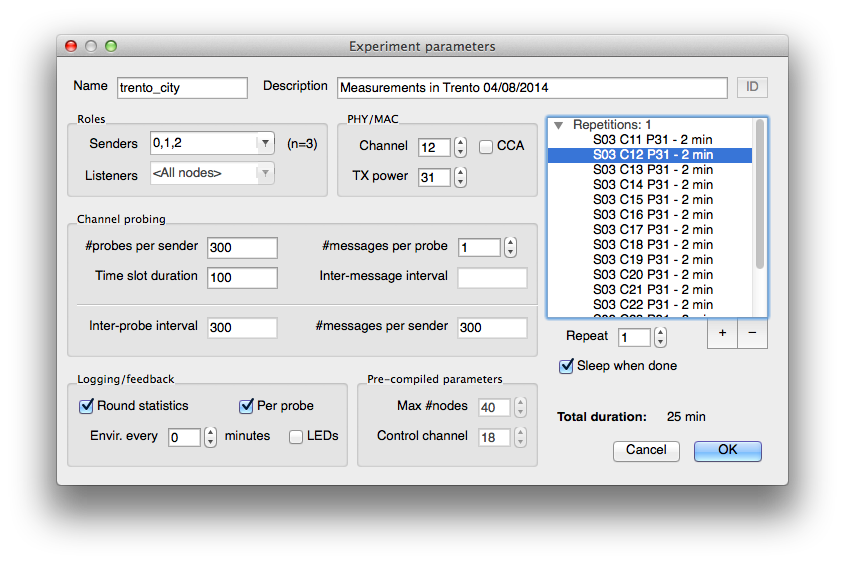
Then, edit the list of tests (rounds), specifying the following parameters for each of them:
- - node role/functionality: senders (you may use enumerations and ranges, e.g. "0,10-20"); all nodes are listeners
- - channel number and transmit power
- - whether to use clear channel assessment (CCA) or not
- - packets options: number of total probes sent by a node during a round, number of consecutive sendings per
probe (burst size), time slot duration for a node (in ms) and, in case of bursts, the inter message interval inside a
burst - - logging options: round statistics (to store per-round averages) and per probe (to store all packets)
- - how often to sample and log environmental parameters like temperature and humidity (in minutes). Setting zero disables the periodic logging of the environmental parameters, although you will still get them probed once per round if the round statistics is enabled.
Set how many times the round should be repeated (number of repetitions) or add another round with different parameters and then set how many times the round sequence should be repeated.
When the configuration is done, press the
OK button.
A directory with the name of the experiment will be created under $TRIDENT/experiments.
Transfer the experiment parameters to the master node
Before the experiment can run, its parameters should be transferred to the master node which stores them in non-volatile memory.
Each time you upload the parameters to the master node, the identifier of experiment runs (run_id) is set to the beginning of a new range so that the experiment runs are distinguishable even if you reconfigure the master several times or use a backup master.
Connect the gateway node to the PC and start the TRIDENT application.
Specify the gateway connection, e.g.: /dev/ttyUSB0 and press Connect.
Open the experiment and press the Upload to master node button. Definitely, the master node should be in the radio range of the gateway.
Run the experiments
There are two ways to start the experiment: pressing the User button of the master node, or using the in-field assistant. In any case, the master node will increment the run identifier (run_id) every time within the pre-programmed range, so that you will be able to distinguish logged data coming from different runs.
When the master node is idle, pressing the User button will activate the experiment. In case there is no configuration installed in the non-volatile storage of the master node, the blue LED will be turned on.
If the User button of the master node is pressed during an active experiment, the experiment is interrupted by disseminating the stop command across the network. After the dissemination is done (indicated by the LEDs or could be seen in the sniffer), the network enters the idle state so that another experiment can be started.
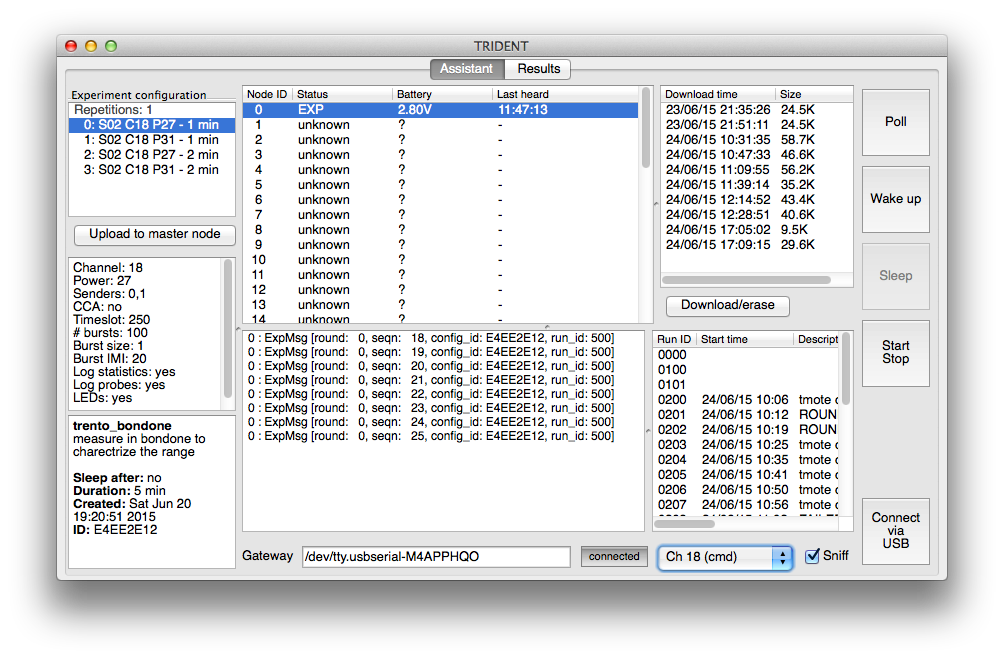
The in-field assistant can be used to start the experiment. Connect the gateway using the procedure explained above and in the Experiment control dialog, under Experiment, press the Start button.
It is recommended to use the in-field assistant to start experiments. It helps in several ways. First of all, with the built-in sniffer you can check that the experiment is running correctly. Another important point is that you will have opportunity to type in the run description and associate it with the actual run_id immediately.
Note that if your experiment is configured to run on a channel different from the control one (18), you should manually switch to the correct channel to be able to sniff experiment packets, get the current run_id or stop the running experiment. Don't forget to switch back to the control channel before reconfiguring, downloading or starting a new run.
When the experiment is started, the master node begins replaying the schedule autonomously, starting one test round after another. At the beginning of each round the nodes are synchronized, and the master announces the round parameters, using a robust multi-hop dissemination protocol.
Traces download
TRIDENT supports two modes for data download: using a USB connection and over-the-air.
Before starting the over-the-air download, the operator should check if the execution of the experiment ended. For this the sniffer can be used. Connect the gateway node to the PC, start the application, open the experiment and check that the Sniff is ticked.
In case the experiment ended and the sleep when done option was chosen, the operator has to wake up the nodes. For this, press the Wake up button.
To check if all the nodes are awake and request their current battery level, use the Poll button. Should any of the nodes remain silent, try to wake them up again, moving the gateway closer to them (the wake-up command is single-hop).
Now the download process can begin:
Select the node for downloading from the list of nodes and then press the Download/erase button.
After the download is done, the flash can be erased, press the Erase flash button.
Connectivity map
In the Results tab of the main Trident window you can observe the results in a graphical form. Choose a run and a round for which to display the results. Now you may go node-by-node seeing the inbound and outbound metric values for all links belonging to the selected node. The green/yellow/red color code of a neighbor node represents the quality of the respective link, based on the minimum of the inbound and outgoing PDR. Gray color means that PDR is zero or data is missing for one of the nodes.

Export the traces
The collected logs can be exported to text tables (readable, e.g. in R) or to a database. A normal export will filter out duplicates (in case you downloaded the same data twice) and data belonging to other experiments (in case you didn't delete the mote storage before running a new experiment). Additionally, there is the Dump all option that exports everything without any filtering. All these operations are accessible via the Results menu.
To be able to export to the database, first you will need to create the database trident, and its tables by running the provided script.
From Results menu choose Export to database.
In the new window, provide the host name, username and password. For the database name use trident. Press OK.
Waspmote instructions
As for TMoteSky, a Waspmote experiment consists of a number of rounds, each initiated by the master node. Master node reads the experiment configuration from SD card and executes the test schedule, disseminating the parameters of every consecutive test among the network. During the round nodes take turns in sending single-hop broadcast probes and logging the ones received from the other nodes.
First of all, program the Waspmotes with the provided code (in the waspmote directory), using the Waspmote IDE.
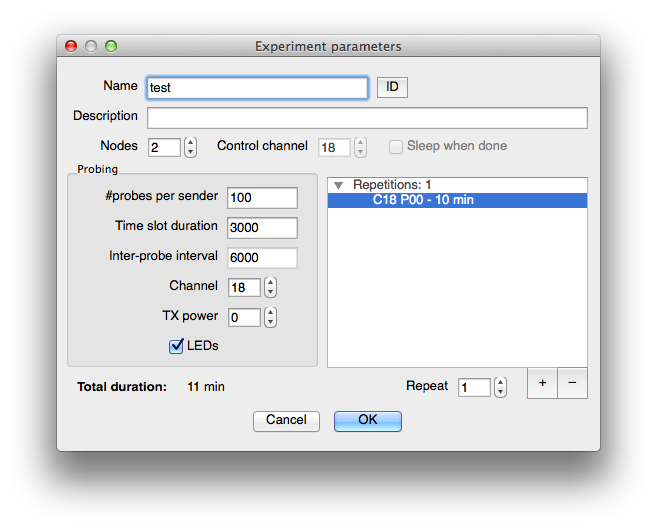
To configure a new Waspmote experiment, select the appropriate item in the Experiment menu.
To initialise the SD cards of the network nodes, use the Nodes menu, to bring in the following dialog.
Insert an SD card of a node to be configured and select the path to the SD card in your system, check or enter a node ID, and press the Initialize button. Do this for all nodes in your network, numbering them sequentially, starting from 1. Node with ID 1 will be configured as the master.
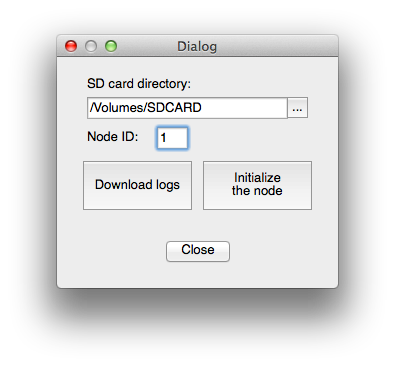
Turn on the nodes. First turn on ordinary nodes, then turn on the master. The experiment will start automatically. After the tests are done, use the same dialog window to download the logs.
More detailed instructions for Waspmotes will be available soon...